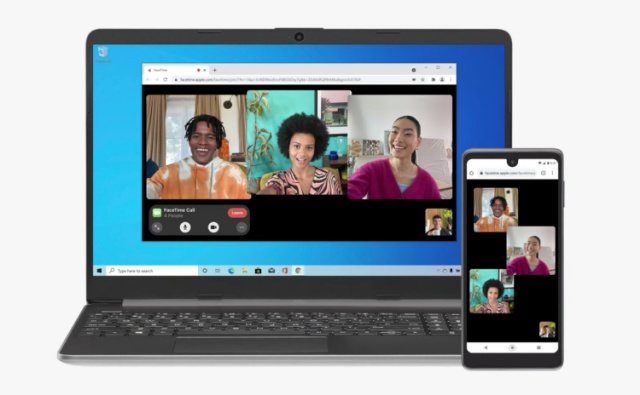
How to Join FaceTime Calls on Windows PC (2021)
To begin with, let’s first check out some of the restrictions and discuss what does and doesn’t work on FaceTime for Windows. It will make the task of setting up and using FaceTime on Windows PCs a lot easier. With that said, let’s dive right in.
How Does FaceTime Work on Windows?
Call it Apple’s strategy to entice Windows users or a forced decision to ward off strong competition from video conferencing apps like Zoom and Google Meet, the Cupertino giant has expanded beyond its ecosystem. While the move to introduce FaceTime on Windows is significant, Apple has put a few restrictions in place as well. Now, many of you must be wondering – how can you install the FaceTime app on your Windows computer? Well, the answer is, you can’t. Apple’s video calling app works only through a browser on Windows and Android. The video calling app supports only Google Chrome and Microsoft Edge on Windows.
Moreover, if you want to get started with a FaceTime meeting, you first need to ask a friend who owns an iPhone, iPad, or Mac to generate a meeting link and share it with you. That means you can’t generate a FaceTime invite link on your Windows device. And you will be able to join a meeting only if you have the link. Adding to the list of restrictions, FaceTime for Windows, unfortunately, also doesn’t support the much-talked-about SharePlay feature. That means you can’t join a FaceTime video call to watch movies with friends or listen to Apple Music together. In a nutshell, FaceTime for Windows only lets you join a meeting through a link and offers basic controls like the ability to mute/ unmute audio, enable/ disable video, and use a grid layout. Beyond these heavy restrictions, the only good thing is that you will now be able to connect with Apple device owners over FaceTime on your Windows computer. And that too without having to create an Apple ID account.
How to Create a FaceTime Invite Link on Mac
As I mentioned above, you will need to ping a friend who owns a Mac or iPhone and ask them to create a meeting link to try FaceTime on Windows. If your friend is a Mac user, they can follow these steps to create and share a FaceTime invite link.
Next, click on the tiny info button located next to the FaceTime link you have just generated.
Now, click on the Share button in the menu.
Up next, select the desired method of sharing the FaceTime link. You can choose to share the link through the Apple Mail app and Messages app. Moreover, you have the option to copy the meeting link and share it via other messaging apps like WhatsApp, Signal, Telegram, and others.
How to Create a FaceTime Invite Link on iPhone and iPad
While I have already detailed the process to generate a FaceTime invite link using an iOS device in our guide to making FaceTime calls between iPhone and Android, here’s a quick refresher.
To begin, launch the FaceTime app on your iOS device and tap the “Create Link” button to generate a FaceTime call link.
Next, tap the info button that appears next to the FaceTime link. Then, tap on the “Share Link” button on the next page.
Finally, share the FaceTime invite link with a Windows user using your preferred method. You have the option to share it via several channels, including Messages, WhatsApp, email, Facebook Messenger, and more.
How to Use FaceTime on Your Windows PC
Note: We are using a Windows 10 PC to demo how FaceTime works on Windows, but the process remains the same for the newly launched Windows 11 and older-gen Windows 8 and Windows 7 OS. Once you receive a FaceTime meeting link, you can join the FaceTime call on your Windows device in a few easy steps. Just follow the guide below:
Now, enter your name in the FaceTime web experience and hit Continue.
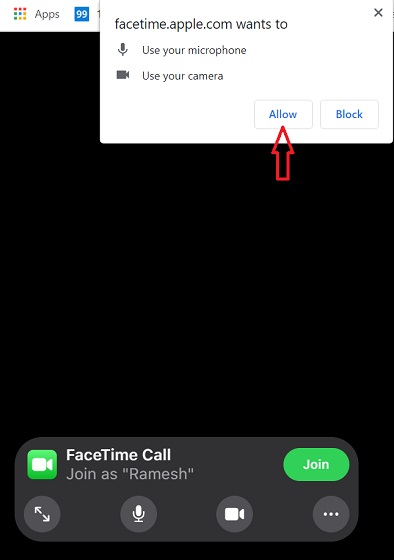
Next, a pop-up message will appear asking you to provide camera and microphone permissions to the website. The message reads — “facetime.apple.com wants to use your microphone and camera.” Click “Allow” on the pop-up to let FaceTime access both the camera and microphone of your Windows PC.
Next up, click the green “Join” button at the bottom left to request the host to let you enter the video call.
You should see a “Waiting to be let in” sign, which means a request to allow you to join the conversation has been sent to the host.
Well, that’s it. You will be able to talk to your friends via FaceTime on your Windows PC once you are let in. You can click on the red “Leave” button to leave the meeting at any time.
Customize FaceTime Controls on Windows
For a better communication experience, FaceTime makes a few basic controls accessible to Windows users via the web. Let me show you how to fine-tune them. Go to Full Screen: During the call, if you ever want to maximize the FaceTime window, click on the maximize button. You can click this button again to minimize the FaceTime window.
Mute FaceTime Call Audio: Click the microphone button to mute/ unmute audio on your Windows PC.
Turn On/Off Video: Click on the video icon to disable/ enable video during a call.
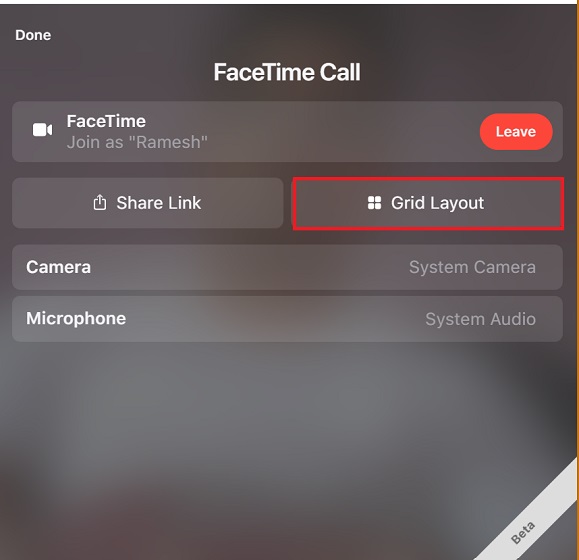
Enable/ Disable Grid Layout: If you want to make all the people in a FaceTime call appear in the grid, click on the three dots button from the control center. After that, click on the “Grid Layout” icon to enable/ disable the grid view. Click “Done” to return to the Facetime call.
Note: You can also share the FaceTime meeting links even during the call. Simply click on the three dots button, followed by the “Share Link” option. After that, share the link with your preferred contacts.
Add FaceTime Bookmark to Google Chrome on Windows PC
If you plan to frequently FaceTime your friends or colleagues, I would recommend you add a FaceTime bookmark to Google Chrome for hassle-free access. This way, you won’t have to dig through emails or conversation threads to find a meeting link time and time again. Moreover, you wouldn’t have to create a new meeting link each time. With the FaceTime bookmark at your disposal, you can get started with a meeting in a couple of clicks. Though I am unsure how long a FaceTime meeting link remains valid, I can confirm that the link remains active for several days. I was able to use a two-week-old FaceTime link with my friends on Android while testing the feature. So, it’s a good idea to bookmark the FaceTime link.
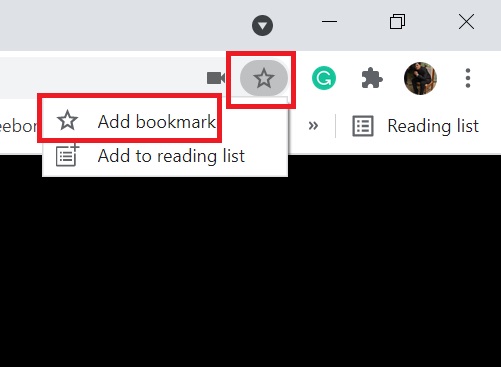
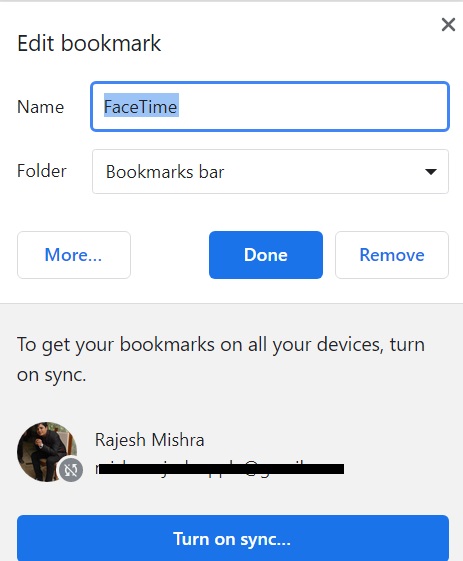
To do that, open the FaceTime link in Chrome and click the star icon located at the top right corner of the address bar. After that, select “Add bookmark“.
Now, customize the bookmark as per your needs. I suggest changing its name to “FaceTime” so it’s easier to access at all times.
Note: The process of adding a website to your favorites in Microsoft Edge is equally simple. Just open the FaceTime link in Microsoft Edge and click on the “Add this page to favorites” button in the address bar. After that, rename the favorite and hit Done.
Add FaceTime Meeting Link As a Shortcut on Chrome Homepage
To quickly access a FaceTime meeting link, you can add the link as a shortcut on the Chrome homepage. If you are a loyal Chrome user, you would already know that the process is pretty straightforward. Still, follow the steps below.
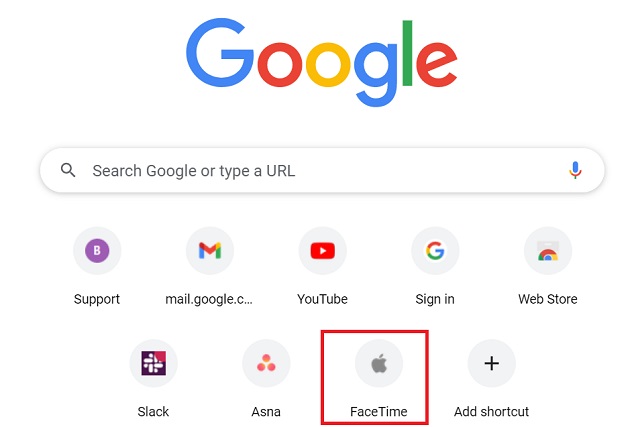
Head over to the Google Chrome homepage and click the “Add Shortcut” button.
Now, enter a suitable name for your shortcut and paste the FaceTime link URL that your friend has shared with you. After that, click “Done” to finish.
And that’s it. You can now join a FaceTime call with friends without wasting any time, thanks to this shortcut on the Chrome homepage.
Tips to Use FaceTime on Windows Like a Pro
That’s pretty much it! While you can’t unlock all the FaceTime’s much-talked-about goodies on Windows, it’s now easier to stay connected with friends with Apple devices. So, that’s a welcome change – at long last. Since Apple has finally shown interest in expanding its presence beyond its closed garden, we might see a more powerful version of FaceTime on Windows soon. Well, I’m keeping my fingers crossed. By the way, what’s your take on FaceTime for Windows, and what are the changes you would love to see in it? Feel free to share your thoughts with us in the comments section below.